
Contents
What is a Board?
A Board divides the screen up into ‘zones’ or areas that you can play different content in at the same time. Think of it like cutting a cake. Each piece represents each zone where you can play different content. Let’s look at the prerequisites for making a Board.
Prerequisites
- An Administrator on your account must have already setup a Board Template.
- You must already have created one more playlists that are designed to play in each zone.
- Your Korbyt user role must be one of the following:
- Tenant Administrator (KorbytGO)
- Administrator (KorbytGO)
- Approver (KorbytGO)
Creating a Board
- From your Dashboard, click ‘Signage’ to expand that section.
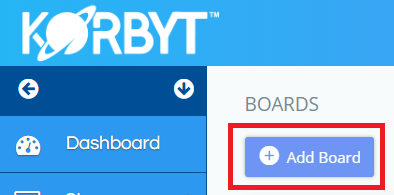
- Click ‘Boards’
![]()
- Click ‘Add Board’ in the top left corner.
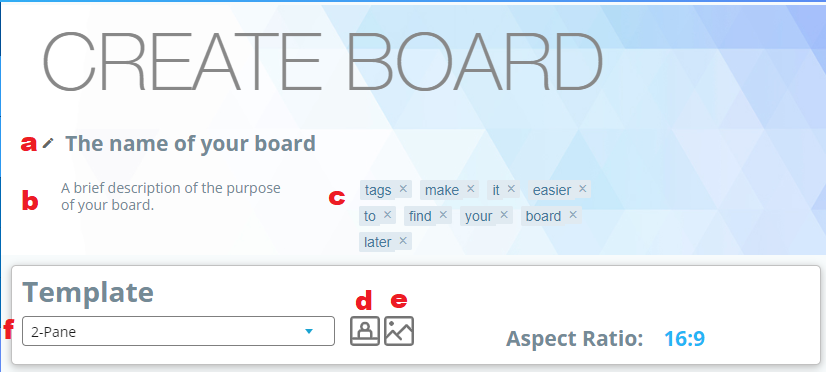
- Type in the following:
- Title – This is the name of the board.
- Description – A brief description of the Board’s purpose, so other users can easily determine its use.
- Tags – keywords that help you locate the Board later.
- Portrait – Populates portrait templates in the template dropdown
- Landscape – Populates the landscape templates in the Template dropdown
- Template – Click this dropdown to view and choose board templates. Once the board is published, you may no longer change the template.

Please Note: If no templates appear in the Template drop-down after selecting the screen orientation, please contact your Tenant Administrator to create a board.
- You may now click the Save button in the top right corner of the page or continue to set up your new board.
Editing your Board
The top left corner of the Board editor shows you your zone layout. The top right area shows you the schedule for the board and what players or player groups it has been assigned to. The Zones section below shows what playlist(s) are assigned to each zone. In order to create a complete board that displays on a screen you will need to add/edit the following:
- Assign a playlist(s) to each zone
- Add a schedule
- Assign the board to a Player or Player Group
- Set the play duration of your board.
- Click the Publish button
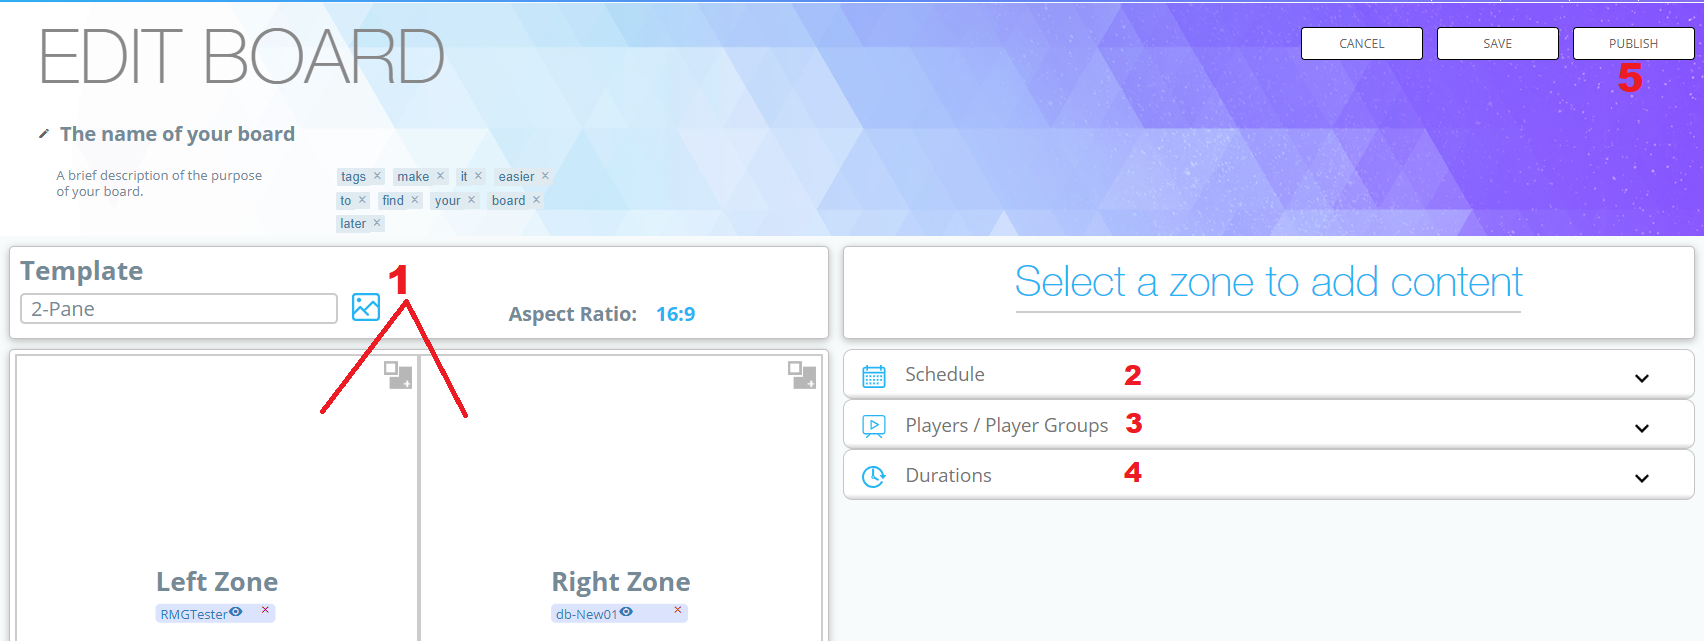
Let’s look at adding playlists to zones first.
Static Playlist Zone
A static playlist zone will only run the specific playlists you choose. When those playlists are edited, the new content will play. To add additional playlists to these zones, you must edit the board and add them.
- Click the zone you want to add your playlist to.
- Select the playlist(s) you want to add in the content box on the right hand side of the screen.
- Click Save
Dynamic Playlist Zone
A Dynamic Playlist Zone allows you to enter tags associated with playlists and the Board will automatically play all playlists that have the tags you specify. If you create a new playlist with any of these tags, it will automatically be added to your board, without further configuration from you.
- Click the zone you want to add your playlist to.
- In the right side of the screen, to the right of Select Content, click the slider that says Static. You’ll see it turn blue and say Dynamic
- Please Note: If nothing happens when you click this, you likely already have a static playlist added to this zone. Look in the zone and click the X next to the playlist name to remove it. You can then activate the Dynamic slide.
- Enter tags you have already created into the search box and click Search.
- Click the plus (+) symbol next to each tag that you would like.
- Click Save.

Board Schedule
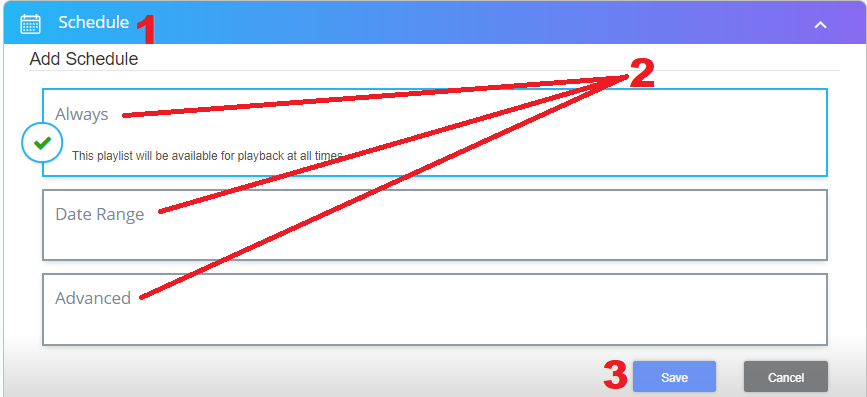
The Board Schedule determines when the board will display and for how long. If you don’t select a schedule, the board will not display anywhere, even if you have it published to players. You can add multiple schedules to the same board.
- Click the Schedule header on the right side of the screen.
- Select one of the following options:
- Always – This causes the board to always be scheduled to a Player or Player group. It will run all day, every day.
- Date Range – This allows you to select a date you would like the Board to start displaying and a day you would like it to stop.
- Advanced. – This allows you to select any combination of the following for your board:
- Start/End Date – Just like the Date Range option
- Which day of the week you would like it to display for.
- Start/Stop time during the day you would like it to display for.
- For more information on Advanced Scheduling, please see How to add special schedule to playlist
- After setting up your schedule, click Save.
Player Groups/Players
This section is where you assign the board to specific players or Player Groups. You may add any combination of Players or Player Groups you have access to.
- Click the Player Groups/Players header, just below the Schedule header
- Click the whitespace anywhere on the line of the Player name. If you click directly on the player name, it will take you to the player information page.
- Click the large blue plus (+) symbol with the circle around it.
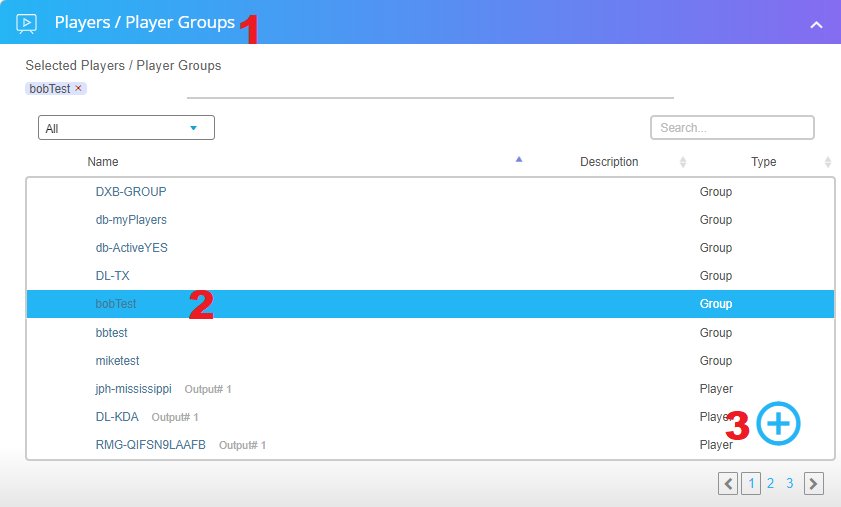
Please Note: If you have a large number of players or Player Groups, you can use the dropdown in the top left to filter only Players or only Player Groups. Additionally you can use the search field in the top right to search for players by tags or names.
Durations
The last options for you to choose is how long you would like for the Board to display, and whether or not it can interrupt other content scheduled to play at the same time.
- Click the Durations header, just below the Players / Player Groups header.
- Make your selection of the following options:
- Fixed – If selected, a text field appears that lets you select the number of seconds that the board will display for before it starts over from the beginning or moves on to the next piece of content. Setting this to zero (0) will cause it to play forever once it starts.
- Zone Driven – If selected, a dropdown appears that lets you select which zone will determine how long the board displays before it starts over from the beginning or moves on to the next piece of content. The duration of the selected zone will set the duration of the entire board.
- Interrupt Play? – When this is activated, it will stop other content that has been scheduled to run during the same time and play this board instead.
Save or Publish
Once you have done all of the above, you can choose to click the Save or Publish buttons in the top right corner of the screen.
- Save – Saves the Board you’ve setup, but does not cause the changes to actually be displayed anywhere.
- Publish – Saves the Board you’ve created and begins displaying it on the Player/Player Groups you’ve selected according to the schedule you have set.