This article will take you through the steps to get started using Korbyt Desktop(InView). There are several sections, and at times links to other articles to go deeper on a specific topic. This article covers many of the common steps to set up your system, and is not meant to be exhaustive to everything Korbyt can do.
If you are looking for guidance on how the Desktop Application will function for your end user see Desktop(InView) User Experience
Guide Agenda
Click on a Section or Scroll Down Through the Steps
Click on a Section or Scroll Down Through the Steps
.![]()
Logging In
- To log into the Korbyt Anywhere Content Management System (CMS) navigate to Korbyt.com/login
- Chrome or Edge web browser are required for full functionality
- Enter your email address and password
- Or use the SSO service configured for your tenant
- When you login you will be viewing the dashboard for your service
- Navigation in the system is done through icons at the top of the screen
Navigating the Mega Menu
![]()
- The Hamburger ICON
 in the upper left opens the Mega Menu
- Giving access to all the features and services in the account
- The Gear Icon
 in the upper right opens the settings menu
- Letting administrators set system wide controls like Launchpad Behavior and
- Hovering over the profile picture outline in the upper right corner will open the User Profile and the CMS User Management options
- Letting individuals set a profile picture
- Letting Administrator Manage and Add other CMS Users who can manage the system
If you need to add other CMS Users to the system the article How to Manage CMS Users will take you through those steps
.
There are settings within the Tenant that will change the appearance of the Desktop Application login Screen and establish the options that the end user will have when using the application.
Branding – Logos, Icons, Colors
The branding of the Desktop Applications Login Screen can be customized from within the Korbyt Tenant.
These branding settings only affect the login screen. They do not affect any other section of the Desktop application. They will also only be seen after the initial login that asks for the Tenant Code.
Begin by clicking the settings Gear Icon in the upper right, and you will be shown the General settings section
On this screen you are able to set a Primary Color, Stacked Logo, and Custom Loader.
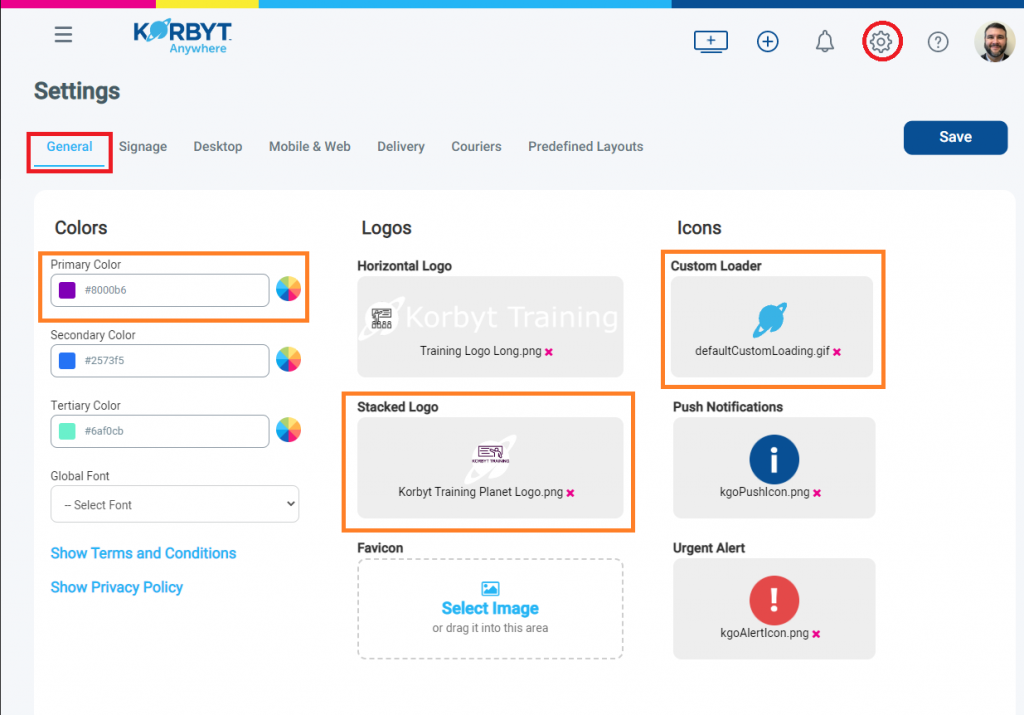
- The Primary Color will be used to create a color gradient on the login screen
- The Stacked Logo will appear at the top of the login screen
- The Custom Loader is an image that will appear if the system has a moment where it is processing information from the system.
- The Customer Loader will not always be seen by your end users, but may occasionally appear and can be customized with an static image or a GIF
Other settings in this section will not affect the Desktop Application, and are used for the Mobile, Web and Email Product
For more information on setting these settings see the Desktop (InView) Application Settings article
Desktop Interface Preferences – Application Icons and System Options
Administrators have the ability to disable several different icons and system tray options that the end user will have available to them
Begin by clicking the Settings Gear Icon ![]() in upper right, then selecting Desktop settings section
in upper right, then selecting Desktop settings section
You will find two sections of options. The default is that all options will be turned to the ON position
By toggling any of them to the OFF position will will remove that icon or option from ALL of your Desktop end users.
Application Icons
This refers to the icons that appear in the Desktop Message when the mouse moves to the upper right.
By toggling the sliders off in the system settings you will remove them from the end user’s experience.
System Tray Options
This refers to the options that will be available to the user when they right click the Korbyt Application Icon in the Windows System Tray.
Based on your Windows Taskbar and System Tray settings your users will likely need to click the Up Arrow to expose the full list of running system applications.
Right-Clicking the mouse on the Korbyt icon will show the System Tray Options
By toggling the sliders off in the system settings you will remove them from the end user’s experience.
A common choice is to remove the Change Password option from the list for installations that are using Single Sign On (SSO) to authenticate a user
For more information on setting these settings see the Desktop (InView) Application Settings article
.
End Users are those that will be logging into the Desktop Application
For your audience to be able to log into the Desktop application they have exist as a listed User in your tenant. If you subscribe to the Korbyt Anywhere Mobile, Web, & Email platform, that service shares the same Users list as the Desktop Application. You will not need to add the same person twice if they are a user of the Desktop application and the Mobile, Web, & Email service
This type of user is different than an account as a Content Manger in the CMS system. People who are already CMS users will need to also be listed with in the End User list to be able to login to the platforms in that way.
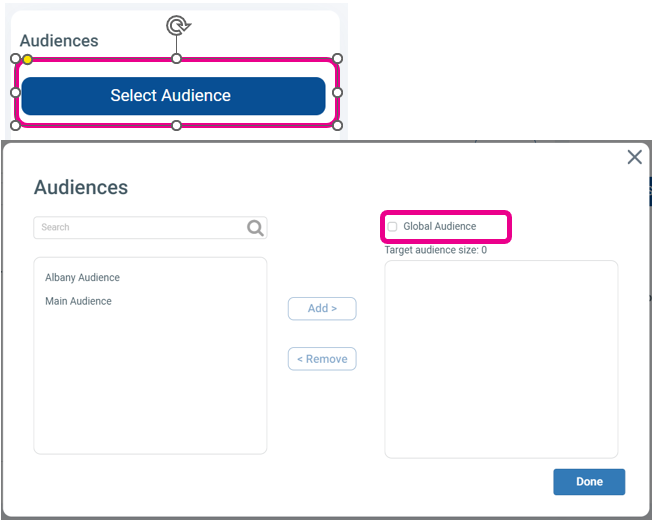
With multiple End Users in the system how they receive different Messages in the Desktop Application is by being members of different Audiences. Creating audiences is not required if all Desktop Users will be receiving the same message.
Adding End Users
To add End Users, Open the Mega Menu ![]() in the upper left, then Select Users under the Users & Audiences heading
in the upper left, then Select Users under the Users & Audiences heading
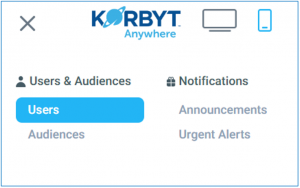
- On the Users screen you can use the Add Users dropdown to start adding users

- Adding a Single User (one at time) will require setting each users information
- Required are First Name, Last Name, and either an Email or a Username that the users will use to log into the service

- Adding users through either a One-Time Import or Scheduled Import will involved using a CSV file to fill in users information
- When you select either One-Time Import or Scheduled Import a dialog box will open which will allow you to download a template that will have columns identified for where specific information is filled in
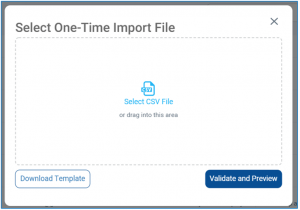
- You can then upload your completed CSV File, Validate and Preview, and then Import your Users
- When you select either One-Time Import or Scheduled Import a dialog box will open which will allow you to download a template that will have columns identified for where specific information is filled in
For more detailed information please visit these Knowledge Base Article How to Manage End Users of Desktop(InView) or Mobile, Web, & Email
Creating Audiences
Audiences can be created in Korbyt to Differentiate the messages that a group of End Users receives
- For example, a Desktop Message that specifically applies to Sales team members can be assigned specifically to a Sales Audience, if that audience has been created and defined
- If all End Users in your organization are going to receive the same message, then creating Audiences is not required
If you also use the Mobile, Web, and Email service from Korbyt Audiences will be shared between the two platforms
The Knowledge Base Article – Creating Audiences can take you through the steps of creating an audience
.
Message Builder
Messages refers to the highly customized and dynamic designs that can be created within Korbyt and then shown through the Desktop(InView) application.
Messages are very similar to Layouts for Signage, and use the same design tool interface to create them The Builder Tool
Messages can be found in the Mega Menu![]() in the Desktop section
in the Desktop section
- You can change the view of the messages that already exist by toggling the folder view on and off
- You can take actions on individual messages that exist using the Action Icons to the right
- Published and Draft Messages will have different options
- Published Messages are the ones that will be available to be assigned to an audience
- A Message can only be Published by Content Approves and Higher
Clicking Add Message, takes you through the steps to create a new message based on a starting design.
There are several options for the basis of a Message, but the most commonly used is a Default Template with a Single Zone
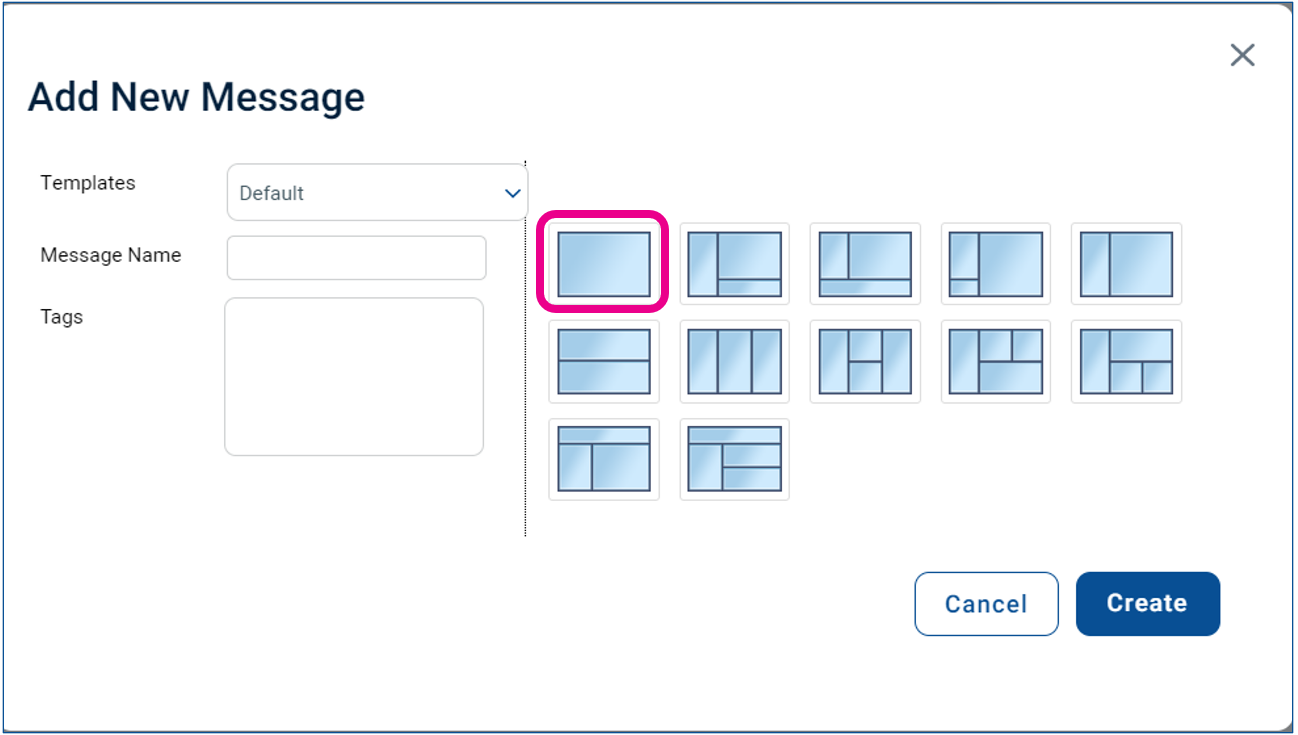
Creating a New Message, or clicking the Pencil Icon on an existing one will open the Builder Tool
Builder Tool
the Builder Tool is the GUI based design system used to create and edit Messages and Layouts in Korbyt
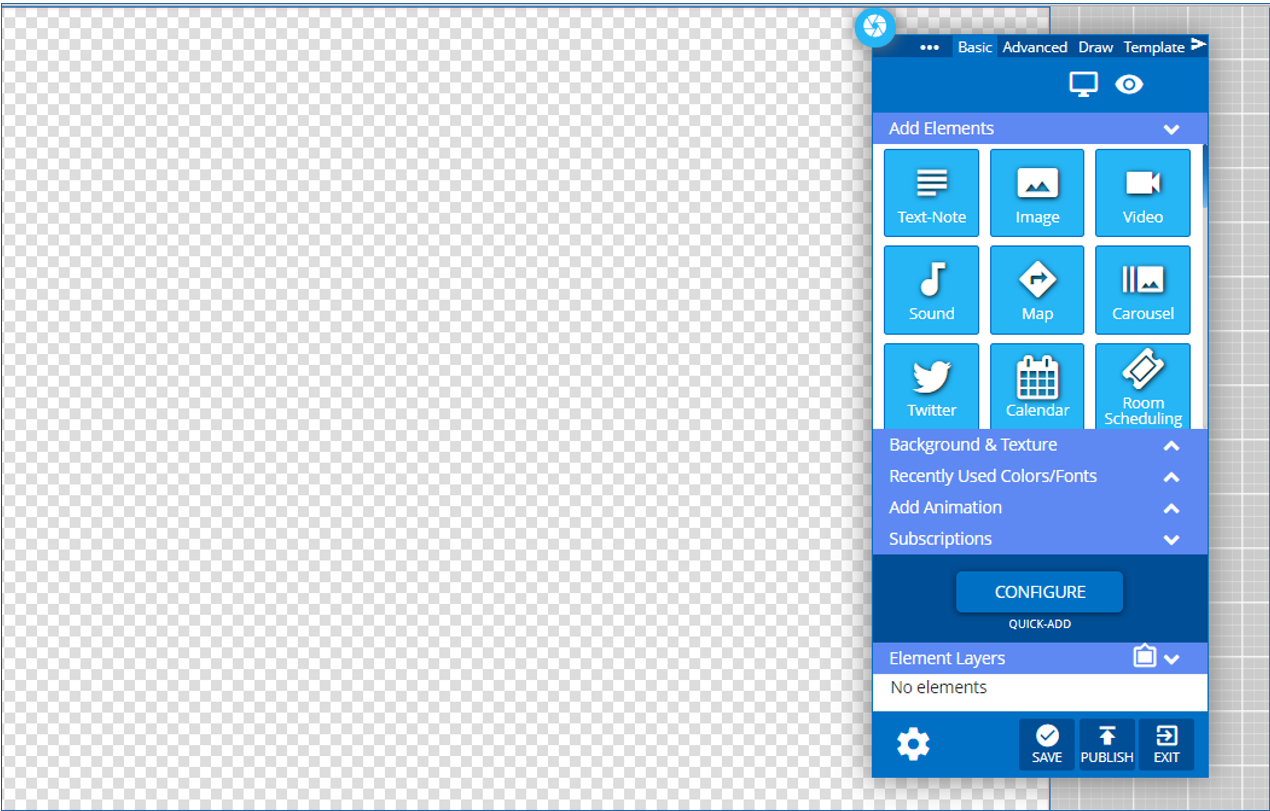
Items are added to the Message by clicking and dragging them from the Add Elements section of the Control Panel
To add an image to the Message you would click and drag the blue Image tile to the canvas
When you add an item to the Message it will be present in it’s own space, with a red highlighted border when you are interacting with it.
![]()
Items ton the canvas can be
- Moved by clicking and dragging the item
- Resized by clicking and dragging the lower right corner of the item
- Edited by clicking on the blue Gear icon in the upper right corner of the item
The Builder Tool is a very powerful interface for designing Desktop Messages and Signage Layouts, more information on how to use the Builder Tool can be found in these articles
- Using the Layout Builder – a guide to using the Builder Tool, worded for Signage Layouts but applicable to Message Builder as well
- Layout and Builder Elements – a guide to all the elements available to add to a layout
Playlist Option
If you do not want to design a Message Specifically for an Audience you will have the option in to Assign a Playlist instead. Playlists are traditionally focused on Signage, but can be used in other ways like this.
Creating a Playlist
Playlists can be found by opening the Mega Menu![]() and then clicking on Playlists at the top of the Schedule section.
and then clicking on Playlists at the top of the Schedule section.
You make the choice of which type of playlist you are building when on the Playlist Screen you click Add Playlist and then select either +Playlist or +Clever Playlist

For more information on Creating Playlists visit these Knowledge Base articles
- Configuring Clever Playlists
- The Suggested type of playlist
- Configuring a Standard Non-Clever Playlist
- Available for use with players that are running Korbyt SW Agent version 1.9 or lower
.
Assignments
Assignments are what ties a specific Message or Playlist to an Audience of End Users
You can find Assignments in the Mega Menu![]() in the Desktop section.
in the Desktop section.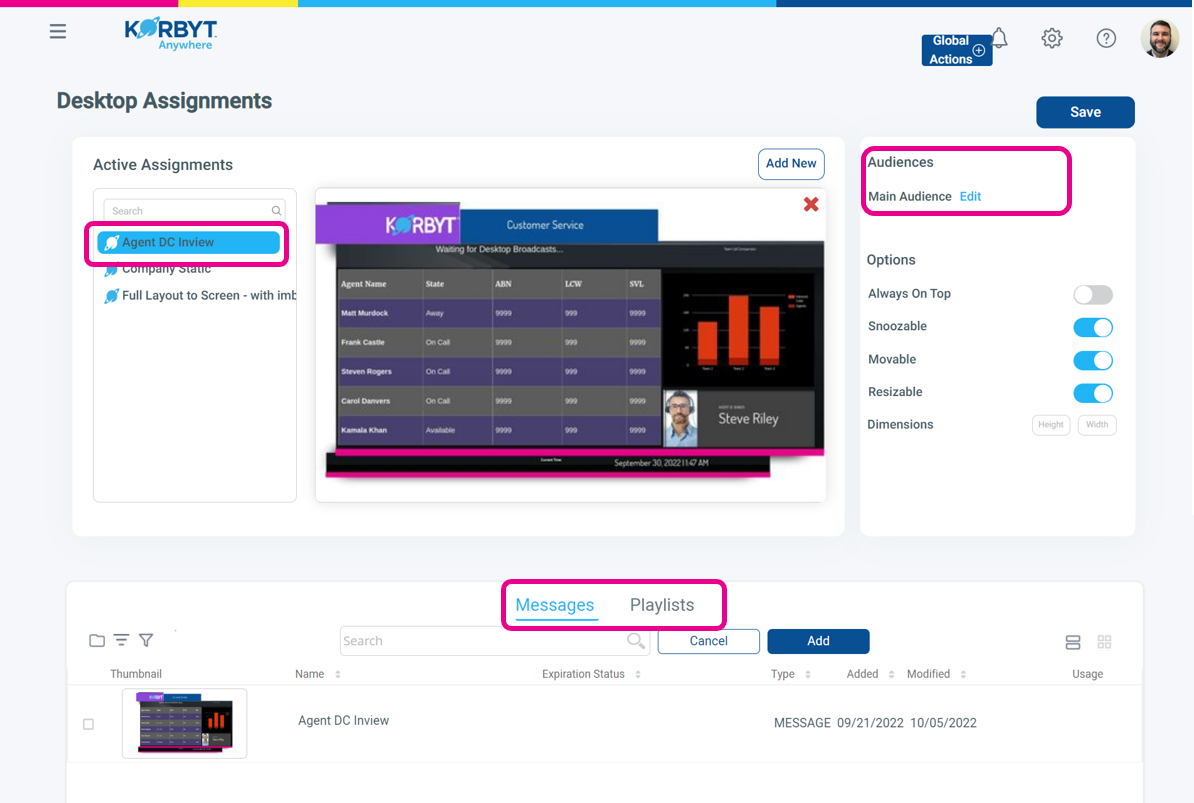
- You will see existing assignments to the left, their names based on the title of the item that is assigned
- If you click an existing assignment you will see a preview of the content assigned in the center
- To the right are the Audiences that are assigned the message
- Below Audience are options for how this assignment will behave for the end user
- Clicking Add New will open a menu at the bottom where you can select from Published Messages or Playlists
- When you Select or Edit and Audience you will be able to select from the Audiences Create, or you can select Global Audience to send to all Users
