This article reviews how to create and manage Predefined Templates that will be available as Launchpads to Korbyt CMS Users
The Launchpads reviewed in this article will create Full Screen content that will have it’s own Dedicated Playlist directing it to selected players. These playlists will exist in rotation with other existing playlists
If you are looking for more general or more specific information on Predefined Layouts in Korbyt please also see:
Guide to Korbyt Launchpads and Predefined Layout Templates
Predefined Layouts for Web Based Submission
Launchpads for Partial Screen Areas and Tickers
This Guide Reviews
- Creating a New Predefined Layout for Launchpad Use
- The End Users Experience for Full Screen Launchpads
- Optional Tenant Wide Settings for Launchpads
Creating a New Predefined layout for Launchpad Use
To create predefined layouts:
- Open the Mega Menu
and then under Content, click on Layouts
- Click the Predefined Layouts
 icon in the upper right (between filter and files).
 - Click Add Predefined Layout.[Add screenshot]

- Configure the Predefined Layout:
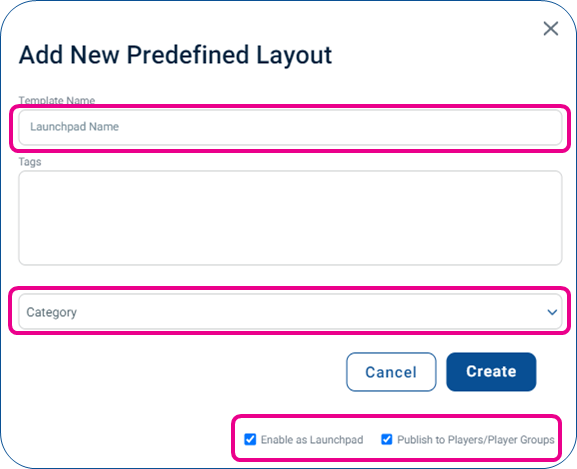
- Create a unique name
- Optional – Tags will help identify and organize, but are not required
- Category Drop Down – This will define which category your new Launchpad is in
- Settings for Direct to Player Launchpads
- Check Enable as Launchpad
- Check Publish to Players/Player Groups
- Click Create.
This will open a new Layout in the Builder Tool
- Use the Layout Builder to add placeholder text, images, and videos:
- Drag the element icon from the Controls dialog on to the canvas.
- Add the necessary content.
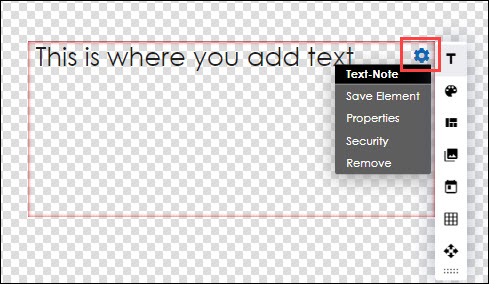
- Click the gear icon in the upper right of the square field and select Properties.
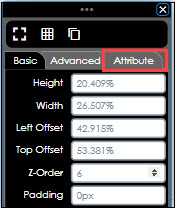
- Click the Attribute tab.
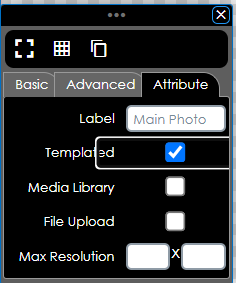
- Add a label.
- Select the Templated checkbox. This will make it a space that a user can enter a value into
- Elements that are commonly used as Templated areas
- Text Elements – for users to type in a static message
- Text Ticker – for users to type in a scrolling message
- Image or Video Elements – for users to share media
- If it is a Media space (Image or Video) you will have the option to define where the media item has to come from
- Leaving neither checked will allow the user to either Select from the Media Manager
- Checking Media Library will force the user to select an item already uploaded to Korbyt
- Checking File Upload will for the user to upload a new media item from their computer
- If it is a Media space (Image or Video) you will have the option to define where the media item has to come from
- After all customizations have been implemented, click one of the following buttons at the bottom of the Controls dialog:
- Save: Allows the layout to be saved on the fly to ensure that no changes are lost.
- Publish: Makes the Launchpad Available to others to use through the Launchpad Menu
The End User Experience for Full Screen Launchpad
Once created the new Launchpad Layout will be available through he Launchpad section of the Mega Menu
For someone to use the Launchpad they have to be able to log into the Korbyt CMS as something other than “Read Only” access
To Create New Content using a Launchpad
- Click the Mega Menu
icon and navigate to Content> Launchpad.
- Click on the Launchpad you want to use
- This will open the Launchpad
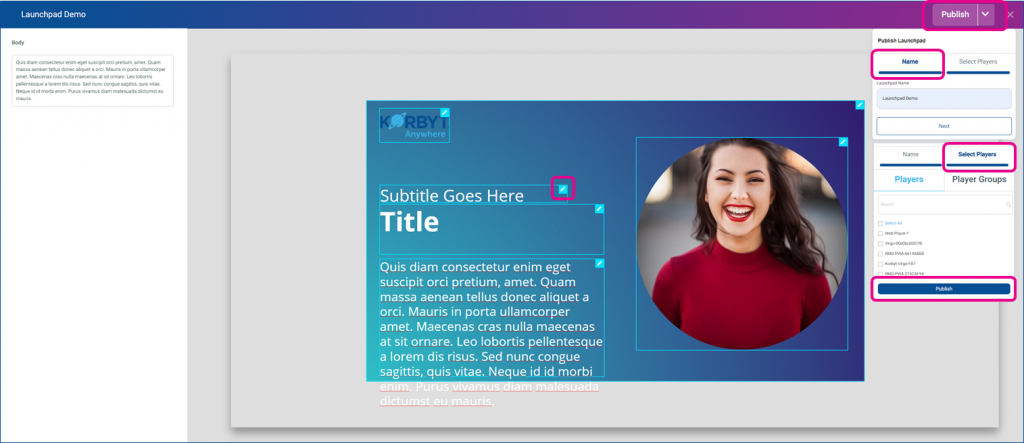
- Click the blue pencil icon
 to edit an area of the template
- Only areas that are defined the element’s settings as “templated” will have the blue pencil
- Once all areas are edited and defined Click Publish in the upper right corner
- Required to Name the Design
- Required to Select the Player/Player Groups it will be published to
Once Published
- The specific design created saves as a Layout in the Layout Section of Korbyt
- It could be further edited using the full Builder Tool like other layouts by users who have the correct permissions
- The Layout that was created is saved onto a New Playlist with the same name as the one set in the publishing process
- This Playlist is programmed to the Players / Player Groups that were selected in the publishing process
To Stop the content from showing a Content Approver or higher in Korbyt would need to remove the item / playlist from the system
Optional Tenant Wide Settings for Launchpads
Administrators in Korbyt have access to settings that will affect the Launchpad Experience for all users and content
To access the Launchpad Settings click on the settings gear ![]() in the upper right corner then select the Signage tab
in the upper right corner then select the Signage tab
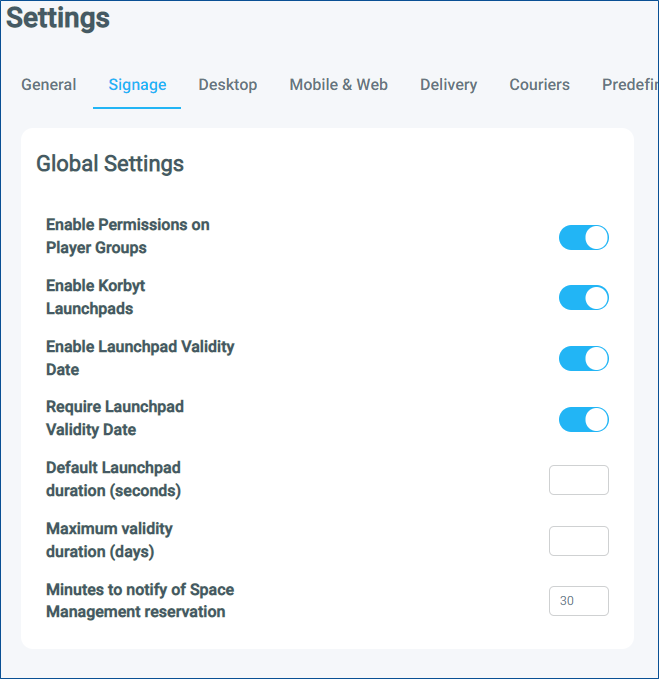
- Enable Korbyt Launchpads – Turns on or off the Korbyt provided general designs for launchpads
- If turned off the only launchpads available to users will be the ones you create
- Enable Launchpad Validity Date – Adds Optional Validity Date Section in Publishing Process
- Validity Date will be a section in the publish process after selecting players
- This can allow for the content to start and stop being shown on specific dates and times automatically
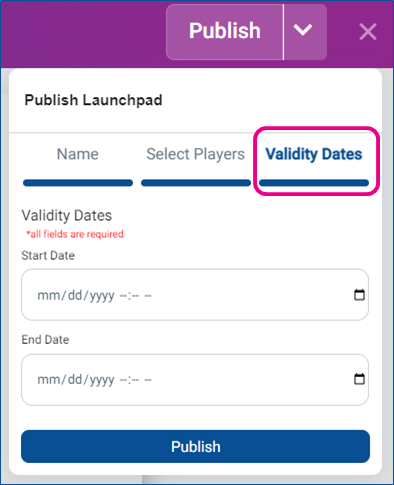
- Require Launchpad Validity Date – Available after enabling validity dates and makes it required to be filled in before publishing
- If not required, then the Validity Date field is optional
- Default Launchpad Duration – Sets the amount of time the launchpad is seen on the screen each time it is displayed
- Maximum Validity Duration – The maximum number of days the Launchpad can be set to be valid for
If you are looking for more general or more specific information on Predefined Layouts in Korbyt please also see:
Guide to Korbyt Launchpads and Predefined Layout Templates
Predefined Layouts for Web Based Submission
Launchpads for Partial Screen Areas and Tickers
