Our Knowledge Base Has Moved
The New Page landing page for the Knowledge Base is https://product.korbyt.com/help
The new version of this specific article can be found at: https://product.korbyt.com/help/articles/3697464-managing-end-users-for-desktopinview-mobileandweb
Please update any of your bookmarks to the new Knowledge Base
For assistance on using the new Knowledge Base, we have a Welcome to the New Korbyt Knowledge Base guide
The new Korbyt Product Page also has sections for submitting feedback on system improvements, a view of our Roadmap of upcoming enhancements, and a change log of all updates.
This article reviews how to add new End Users to your your tenant. End Users are the users who will be logging into the Desktop(InView) Application to view Messages or will be Logging into the Mobile & Web Experience to view and interact with their News Feed.
Both the Desktop(InView) and Mobile & Web platforms share the same End User List. If you have an individual who uses both systems they only need to be added once as an End Users.
End Users are different than Content Management System Users (CMS Users) who log directly into the tenant to create and mange communications. If you are trying to add new CMS Users you should check out the How to Manage CMS Users article
End User Management
To find your End Users in Korbyt
- Click on the Hamburger Menu

- Then from the Mega Menu (depending on your services) you can open click on Users in the Desktop Section or the Audience Section
- If you subscribe to both the Desktop(InView) AND the Mobile, Web, & Email services you can navigate through either path to find your End Users
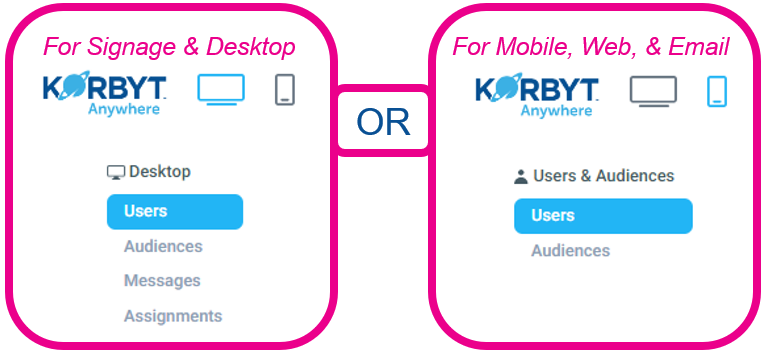
- If you subscribe to both the Desktop(InView) AND the Mobile, Web, & Email services you can navigate through either path to find your End Users
- If you already have End Users in your service they will also be listed on this screen and The Edit, Export User, Impersonate Desktop View, Send Notification and Archive Actions are available.
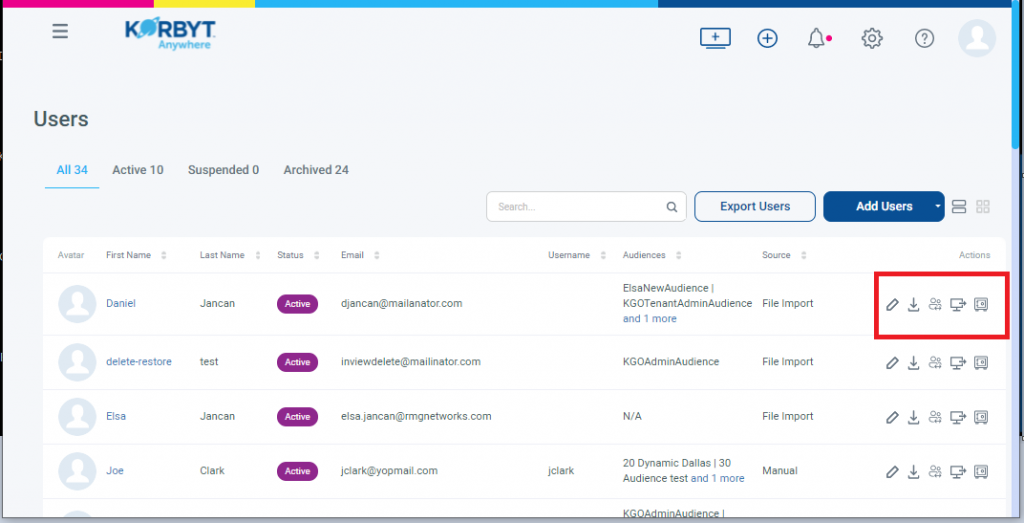
- Users who no longer access the system are Archived, rather than deleted
- This maintains the record of previous interactions
- If a users was Archived and needs to be active again
-
- IF you manually add single users you can not move them back directly, you will need to follow a few steps
- Find the Archived record, click the Pencil to edit, and change the archived records email and/or user name
- This will free up the email address and/or user name to be used for a new active user
- Create a New User record for the person
- Find the Archived record, click the Pencil to edit, and change the archived records email and/or user name
- IF you manage users through CSV files, adding them back to the CSV file will create an active user for them again
- IF you manually add single users you can not move them back directly, you will need to follow a few steps
- Users who no longer access the system are Archived, rather than deleted
There are 4 different methods to add End Users to your Korbyt tenant
- Adding a Single Users
- One Time Import Through CSV File
- Schedule Import Through CSV File
- Azure Active Directory Import
Optional First Step – Creating User Attributes
If you will be creating different Audiences in your tenant so that they can receive different messages these audiences can be managed dynamically using User Attributes. The alternative to a Dynamic Audience is one that would have to be managed manually.
If you are using Azure AD Integrations, you can create Audiences from Azure groups
The section at the end of this article reviews How to Create User Attributes
Add A Single User
To add a single user one at a time follow the steps below:
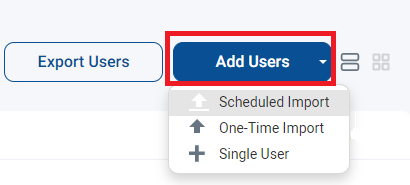
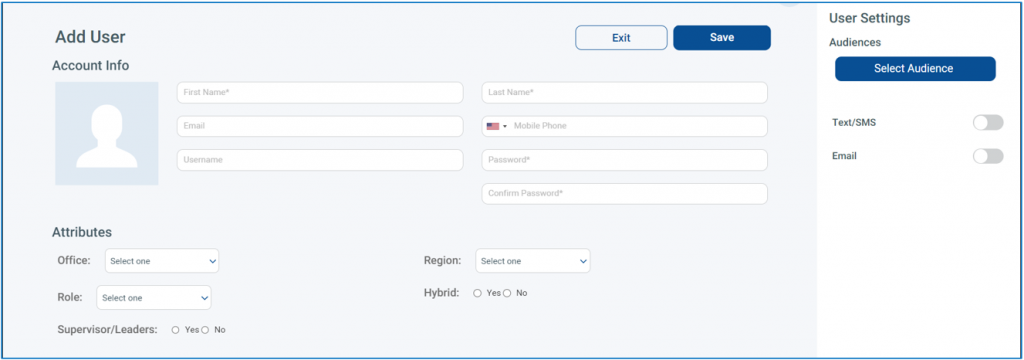
- In the Users screen described above Click on the Add Users button and Select Single Users
- Fill the required information (*)

- Click on the button to Select the Audience. The Audience section is where all the available audiences can be found. NOTE: An audience must first be created to be available in the list of options. The steps to create an audience are listed in the next section below. In this example the audience has already been created.

- Click on the Done button to complete selecting the Audience(s)
- Then Click on the Save Button to complete the action of adding a User

- The employee contact is created. The Edit, Export User, Impersonate Desktop View, Send Notification and Archive Actions are available.

- The user(s) are then imported and listed in the End User section
One-Time Import of a List of Users
To import a list of employees through a One-Time Import follow the steps below:
- In the Users screen described above Click on the Add Users button and Select One Time Import

- Click Download Template to get a CSV File with the correct columns and example information
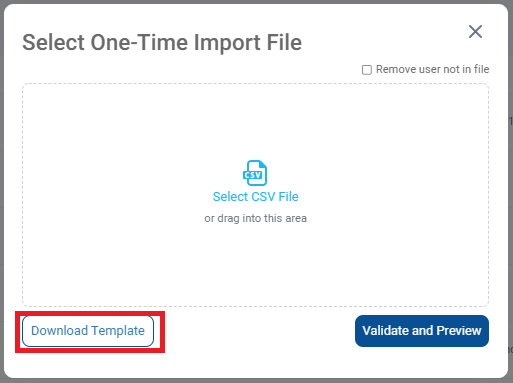
- Navigate to the Downloads Folder on your Computer and you will see the template file
- Populate the file with your list of employees and save
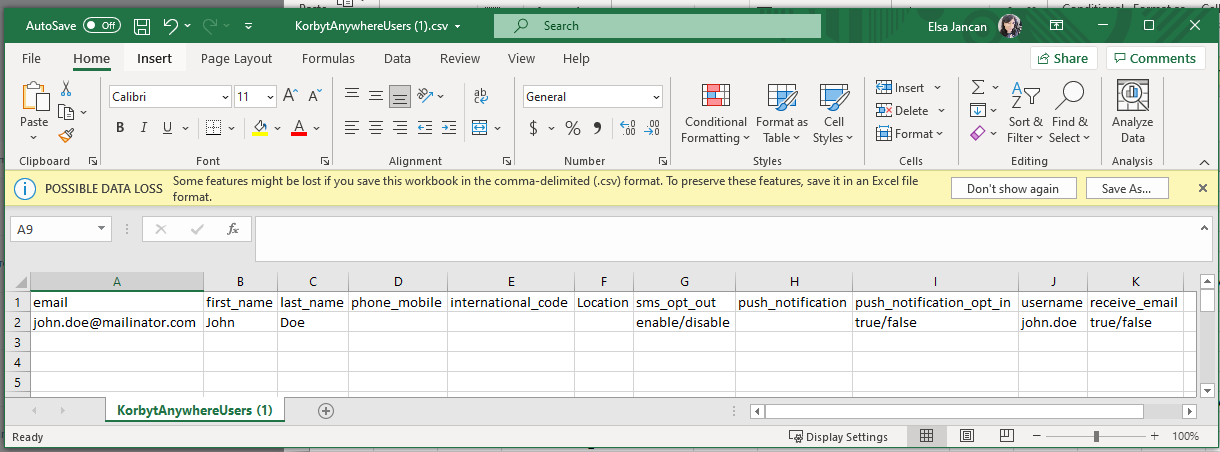
- Fill in the CSV File with your values
- first_name: Must contain a value.
- last_name: Must contain a value.
- email: Must be a unique value. You can leave this field blank. However, we recommend that you include an email address to ensure the highest degree of reach.
- username: Must be a unique value. You can leave this field blank
- phone_mobile: Must be a unique value. If you are loading email address, you can leave this field blank. If you are using username only, mobile number is required.
- international_code: This is the country code for mobile phone numbers such as 1 for US numbers. If you load mobile number, this field is required. Otherwise, you can leave this field blank.
 If you include any user attributes in your CSV import file that are not defined in your Korbyt Anywhere settings such as Department and Location, your file will still load but those attributes will be ignored. See the User Attributes Section of this article
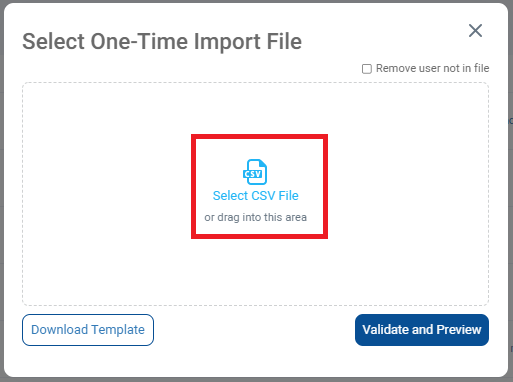
- Back in Korbyt, click on Select CSV file link to select the file.
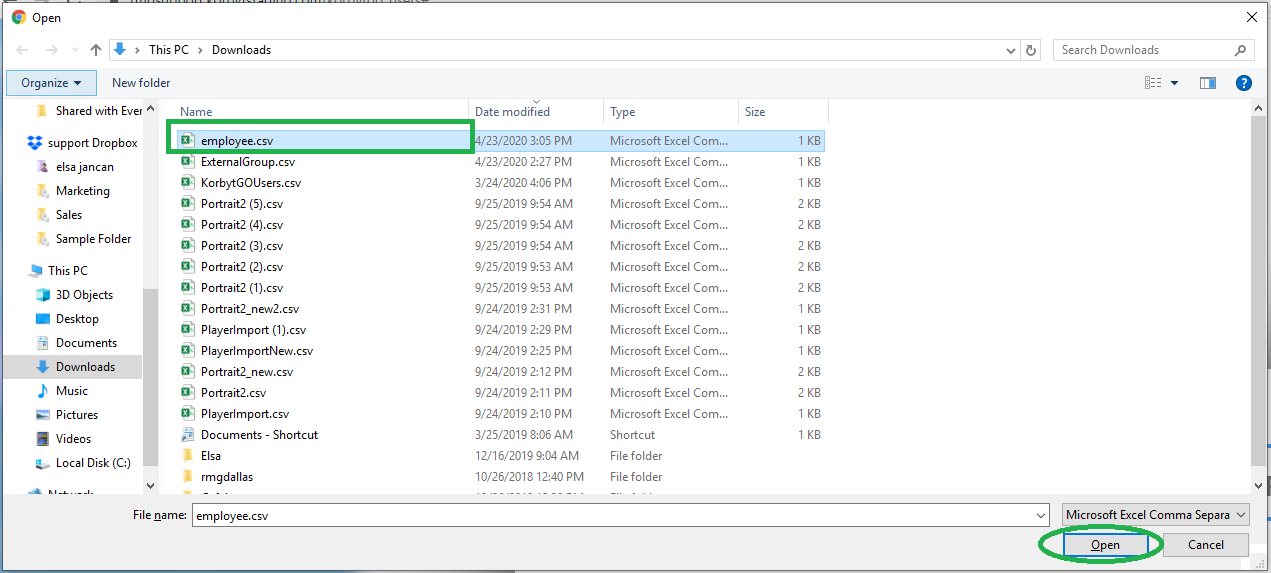
- Locate your completed CSV file, select the file and click Open
- Once the file is selected, click on the “Validate and Preview” button.
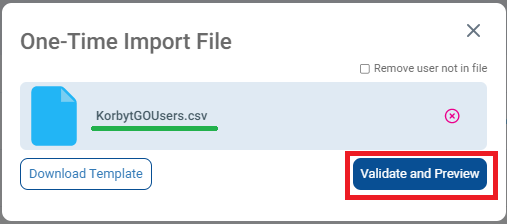
- The Validate and Preview will show the employees on the file.
- You have the Option to Remove Users who are no longer on the file by checking the box in the upper right
- This will add new users and archive anyone no longer present on the CSV File
- Review that all info is correct and click on the Import or Cancel button.
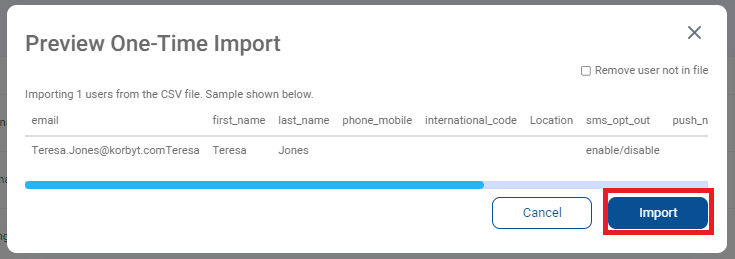
- The user(s) are then imported and listed in the End User section
Scheduled Import of a List of Users
- In the Users screen described above Click on the Add Users button and Select Scheduled Import

- Click Download Template to get a CSV File with the correct columns and example information
- Navigate to the Downloads Folder on your Computer and you will see the template file
- Populate the file with your list of employees and save

- Fill in the CSV File with your values
- first_name: Must contain a value.
- last_name: Must contain a value.
- email: Must be a unique value. You can leave this field blank. However, we recommend that you include an email address to ensure the highest degree of reach.
- username: Must be a unique value. You can leave this field blank
- phone_mobile: Must be a unique value. If you are loading email address, you can leave this field blank. If you are using username only, mobile number is required.
- international_code: This is the country code for mobile phone numbers such as 1 for US numbers. If you load mobile number, this field is required. Otherwise, you can leave this field blank.
 If you include any user attributes in your CSV import file that are not defined in your Korbyt Anywhere settings such as Department and Location, your file will still load but those attributes will be ignored. See the User Attributes Section of this article
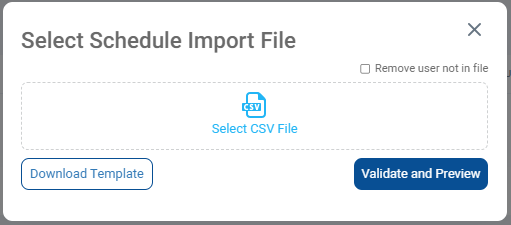
- Back in Korbyt, click on Select CSV File link to select the file
- In this interface you will be able to select a CSV File from your Media Manager
- You can Drag and Drop the File into this window if you have not already uploaded the file to Korbyt
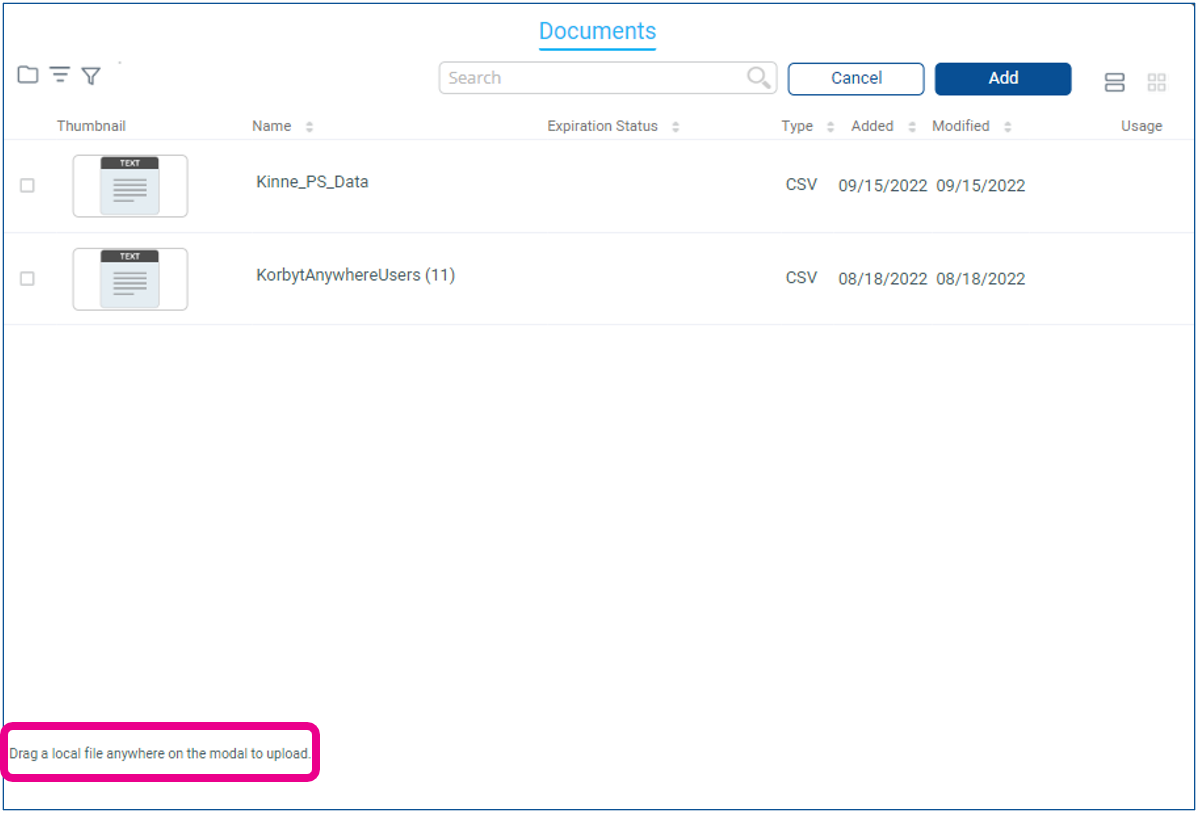
- You can Drag and Drop the File into this window if you have not already uploaded the file to Korbyt
- Once the file is selected, click on the “Validate and Preview” button.
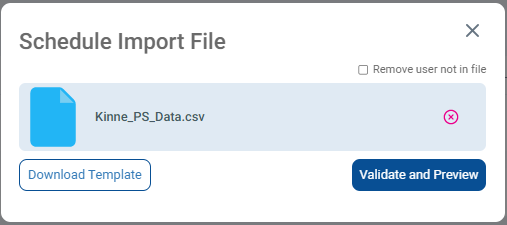
- The Validate and Preview will show the employees on the file.
- You have the Option to Remove Users who are no longer on the file by checking the box in the upper right
- This will add new users and archive anyone no longer present on the CSV File
- Review that all info is correct and click on the Import or Cancel button.
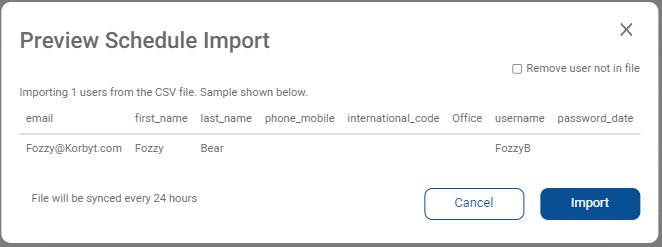
- The user(s) are then imported and listed in the End User section
- The File will be re-checked every 24 hours
- To update the Users, Load an updated copy of the CSV File to the Media Manager
- Make sure to use the same file name, and check the box to Overwrite media if the File already exists
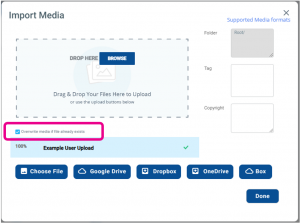
- Now when the schedule runs again and checks the updated file it will add and remove users as you have specified.
- Make sure to use the same file name, and check the box to Overwrite media if the File already exists
Creating User Attributes (Optional)
- Creating User Attributes in the settings allows you to apply those attributes to your end users when they are loaded into the system, and you can then create an audience of users based on that attribute rather than manual selection
- This step is optional, but will mean that creating different audiences will be done through manual selection of members
- If you are going to use Attributes, they should be created in the system before End Users are added
- To set User Attributes Navigate to the CMS Settings by clicking the gear icon in the upper right, then scroll down on the General Tab or select the Mobile & Web Tab depending on your services
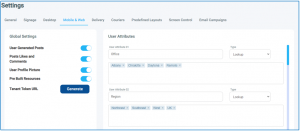
- You can then Name your Attribute
- For example, “Job Title” or “Role” or “Location”
- What ever the name of the attribute is that will separate your users into groups
- Select the Type
- This will define the space this information is entered
- We recommend Lookup as a type with multiple predefined options, you can then define those options that will be available
- For example, a list of Job Roles, or Locations
- Boolean as an option when the selection either “Yes or No”
- For example, If the Employee is a remote worker
- Defining these attributes in settings will make them available to assign to end users both individually and through CSV file import
Importing Users from Azure Active Directory
Korbyt Anywhere provides integration with Azure AD for secure and scalable user management and single sign on, allowing a customer’s employees to login to the Korbyt Anywhere CMS, Desktop, and Mobile applications using
their Azure AD credentials.
This process will require configuring both your Korbyt Tenant as well as your Microsoft Azure services. Your IT Department, as well as Korbyt Professional Services will likely be involved in the process.
This document provides high-level insight into the process steps.
There are three main steps in the setup process:
- Granting Access: In your MS Azure service you must grant Korbyt Anywhere access to the desired Azure AD groups
- In Azure – Registering an app on the Azure app registration portal
- In Azure – Confirming permissions for Microsoft Graph on the app
- Microsoft Graph API permissions are required for integration with Azure AD
- This article lists the specific Microsoft Graph API Permissions Required by Korbyt
- In Azure – Obtaining Administrator consent
- In Azure – Generating a Client Secret
- Recording the details from these steps as they will be used in Korbyt to create the connection
- Importing Users: Inside Korbyt Anywhere, setting the information so that Korbyt can automatically create a corresponding CMS
and/or Desktop or Mobile user for each employee it detects in the customer’s designated Azure groups- In Korbyt – Enter User Import Parameters
- Open the Mega Menu, in the Advanced section select Azure AD
- Click the pink +Add New Azure Users button and enter the details you established in the first steps

- Click Save
- In Korbyt – Map Azure Fields to Employee Metadata
- This will allow you to select the Azure AD Fields you would like to make part of the employee record in Korbyt
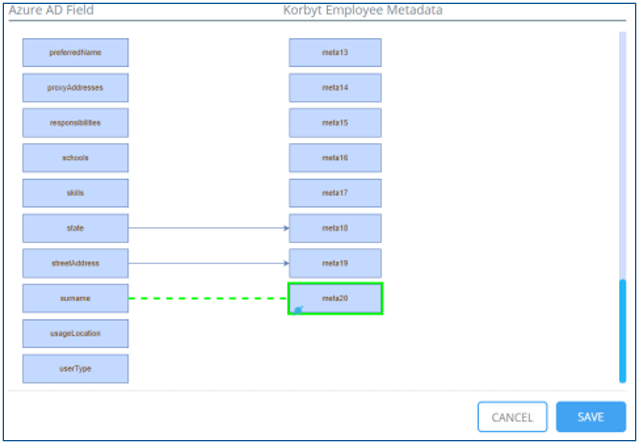
- This will allow you to select the Azure AD Fields you would like to make part of the employee record in Korbyt
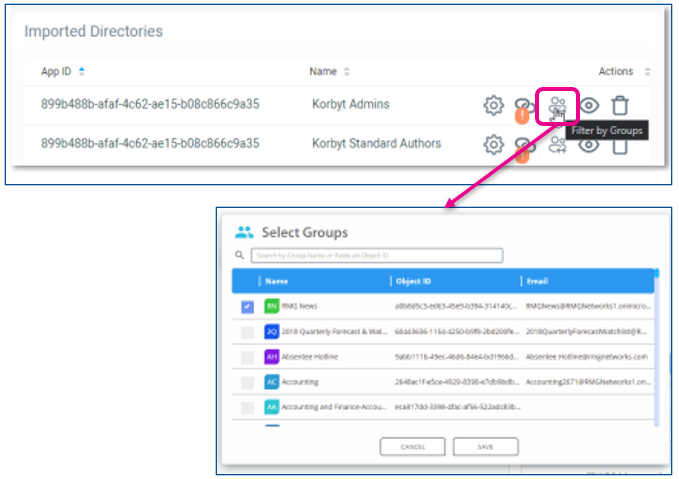
- In Korbyt – Filter By Group
- If specified, the import process will only add users that are members of selected groups. This can be helpful if you have a large number of users and you only wan to import a subset of those uses
- In the Azure Menu, use the Action to select Filter By Group
- Now Established the Azure AD and Korbyt will communicate periodically to match the users that should be in Korbyt based on the information in your Azure AD.
- In Korbyt – Enter User Import Parameters
- Employee Login: Once the import is processed and complete, an employee will be able
to log in to Korbyt Anywhere using their Azure credentials

