Our Knowledge Base Has Moved
The New Page landing page for the Knowledge Base is https://product.korbyt.com/help
The new version of this specific article can be found at: https://product.korbyt.com/help/articles/7681581-newsfeed-posts#ciylxm17ydw
Please update any of your bookmarks to the new Knowledge Base
For assistance on using the new Knowledge Base, we have a Welcome to the New Korbyt Knowledge Base guide
The new Korbyt Product Page also has sections for submitting feedback on system improvements, a view of our Roadmap of upcoming enhancements, and a change log of all updates.
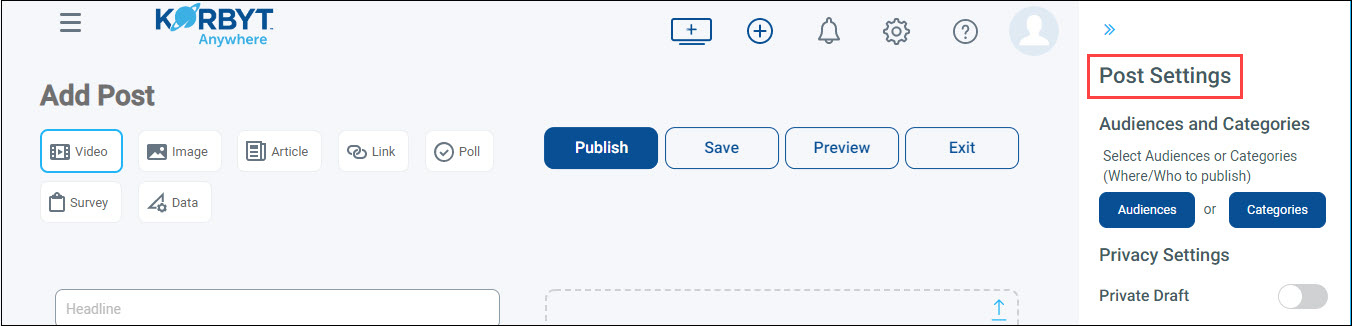
After logging in to the Korbyt Anywhere web interface, you’ll be automatically taken to your personalized news feed. You can create and publish posts directly to categories within your personalized news feed that are already approved or require post approval from an admin.
Before you can publish posts to the news feed via the Korbyt Anywhere web interface, you must ensure that User Generated Posts has been enabled for your tenant. For more information about enabling User Generated Posts for your tenant, refer to Enabling User Generated Posts.
To publish a post:
- Click the + icon from the main menu.
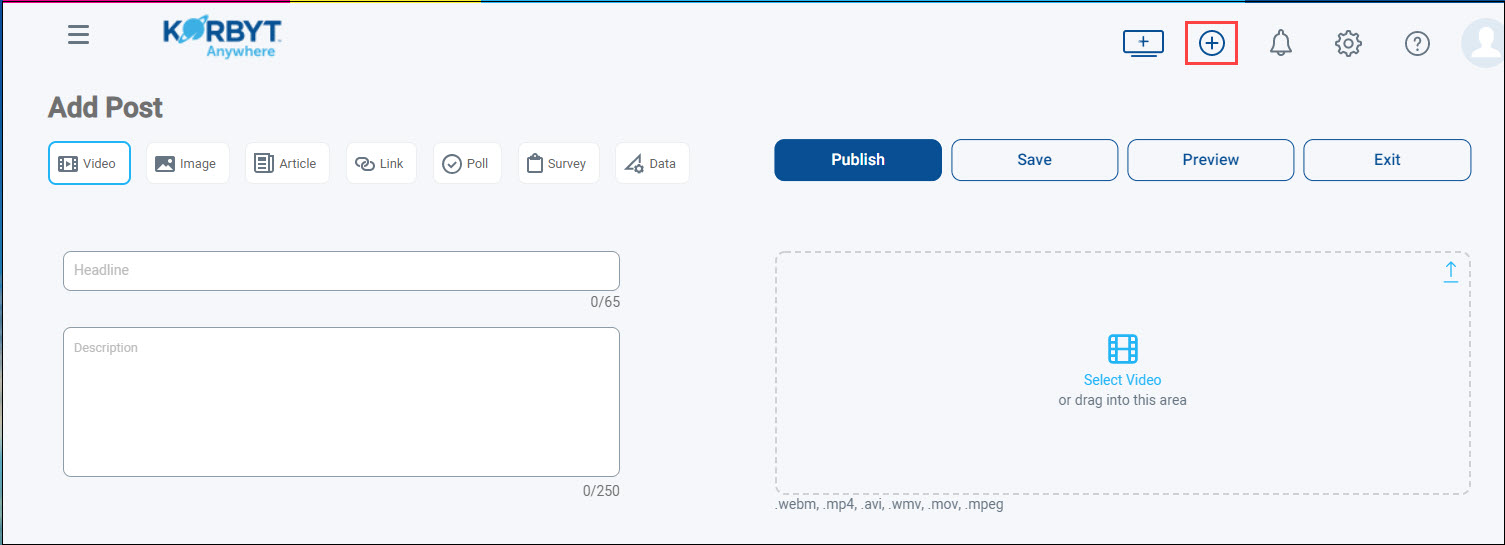
- Select a post type (video, image, article, link, poll, survey, or data).
- Enter a headline and description.
- Do the following:
Post Types Available Steps Videos Add the appropriate video. Images Add the appropriate image assets (up to 10). Articles - Add the appropriate images if necessary (up to 10).
- Use the WYSWIG editor to add the necessary article content.
- If you want to indicate that the post must remain at the top of the user’s news feed until acknowledged, select the Acknowledge post button toggle.
- If you want the system to record the user’s on-screen actions when viewing the post in full-screen mode, select the Yes toggle for the Record interactions when viewed full-screen toggle.
Links - Enter a Link URL (25 characters or less if possible).
- If you want to replace the cover image, add a new image.
Polls - Enter a Question Title.
- Enter an Answer.
You can add multiple answers by clicking Add Answer. - Select an End Submission Date.
- Select the Anonymous toggle to keep all responses anonymous.
Surveys - Add the appropriate images if necessary (up to 10).
- Select one of the following options:
- New Survey: This option should be selected if you want to create a custom survey from scratch.
- Copy Survey: This option should be selected if you want to leverage and customize pre-defined surveys.
- Extend Survey: This option should be selected if you want to leverage pre-defined surveys without making any customizations.
- For custom or copied surveys, enter a survey name, add the necessary questions, and add answers for those questions.
- Select a Survey Close Date.
Data - Add the appropriate images if necessary (up to 10).
- Click Add Data to select the appropriate messages.
- Set the necessary Post Settings.
- If you’d like to see how the post will appear to your users, click Preview.
- If you’re not ready to publish the post, click Save.
- If no additional changes are needed, click Publish.